Anything But a Card

PalsBlogHop_2016

Welcome to the Pals Blog Hop for November 2016. We are thankful you stopped by to take a look at our new 2016 Blog Hop monthly themes.  This month our projects feature items considered 3D, Home Décor or Gift Sets. We hope to provide you with lots of ideas and hope you enjoy our creations.

You may just be starting the Blog Hop or may have come from the previous link from the Line-up on the Pals Blog Hop listing shown below. The full lineup will help you move along from blog to blog so you may see all the projects.

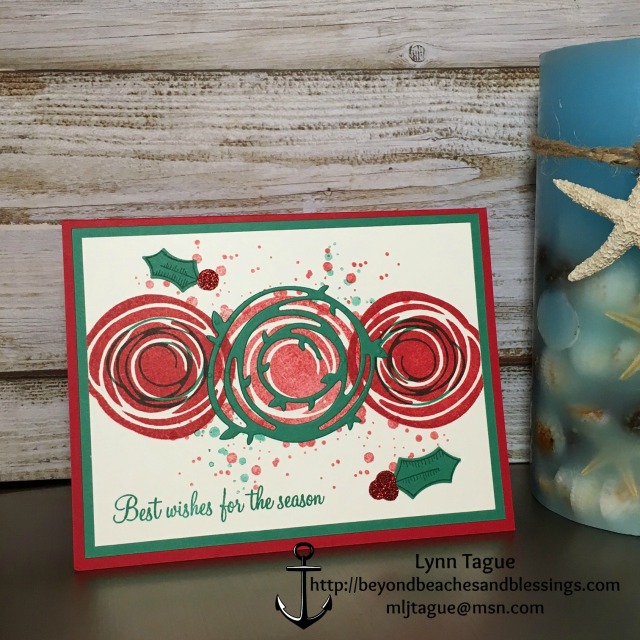
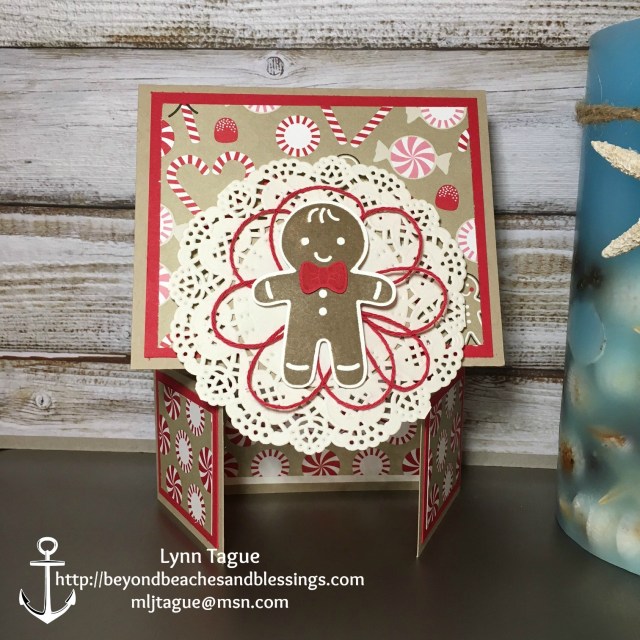
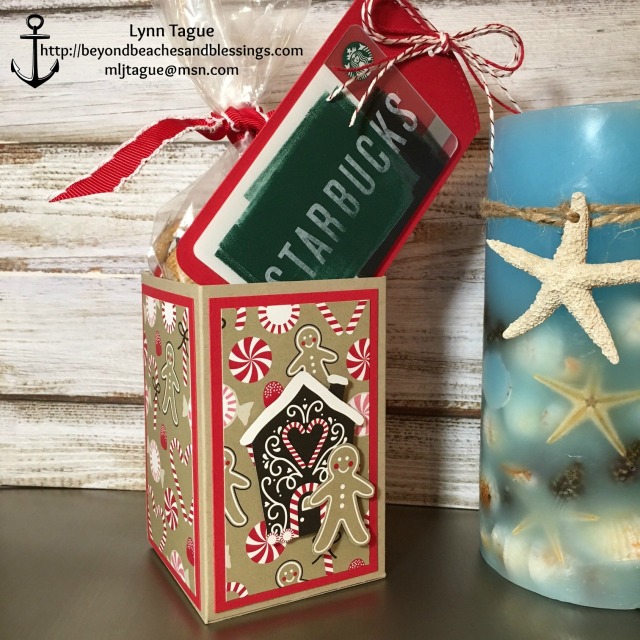
For this month’s project, I decided to create a treat/gift combo box using my favorite suite from the SU! Holiday Catalog – Candy Cane Lane. This original gift box holds homemade snack mix or holiday candy while also providing a special compartment for a gift card. This time of year, I am always looking for a gift for special friends, co-workers, gift exchanges, hair stylists, teachers, and the like. I am sure you find yourself seeking small but special gifts for these important people in your life, too. This little, easy to assemble gift box is just the ticket.

StampinUp Christmas 3D Snack and Gift Card Holder made with Candy Cane Lane DSP, Candy Cane Christmas stamp set, Stitched Shape Framelits, designed by demo Lynn Tague. See more cards and gift ideas at BeyondBeachesandBlessings.com #BeyondBeachesandBlessings

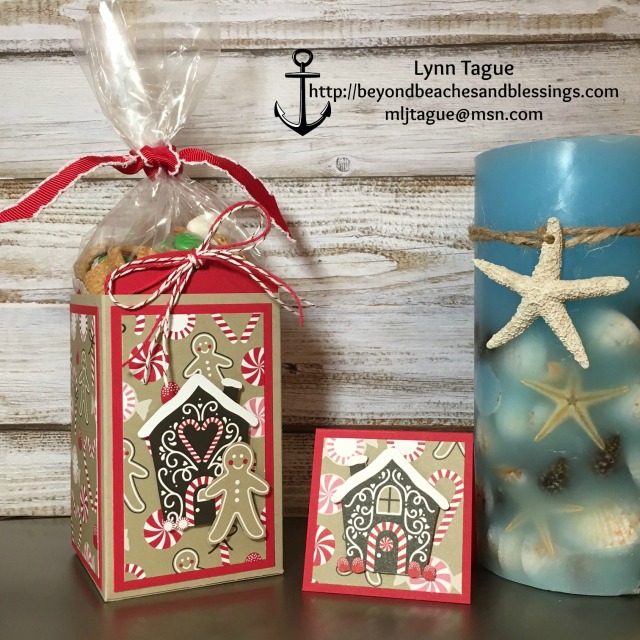
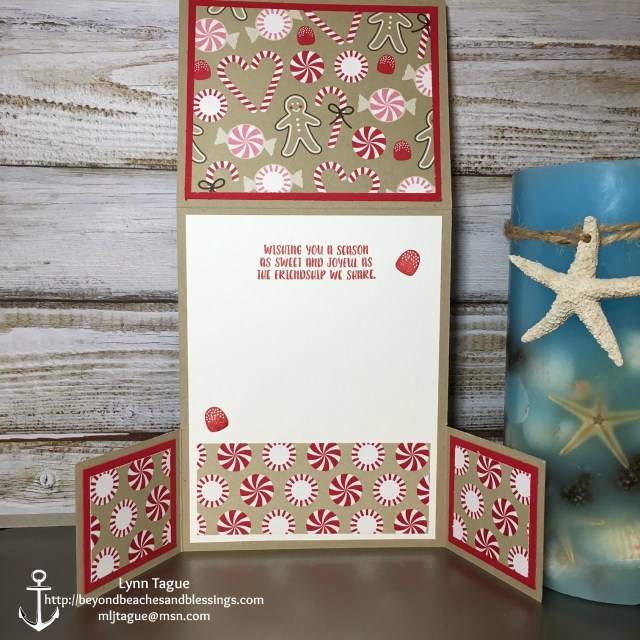
I filled a Gusseted Cellophane Bag with homemade Smores Christmas Snack Mix and tied with Real Red 3/4″ Stitched Edge Ribbon. I adhered a Starbucks gift card to the hidden insert and topped this off with Candy Cane Lane Baker’s Twine. You may not be able to see it clearly in the photo, I used the largest oval from the new Stitched Shape Framelits die set to trim the top of the gift card holder insert.

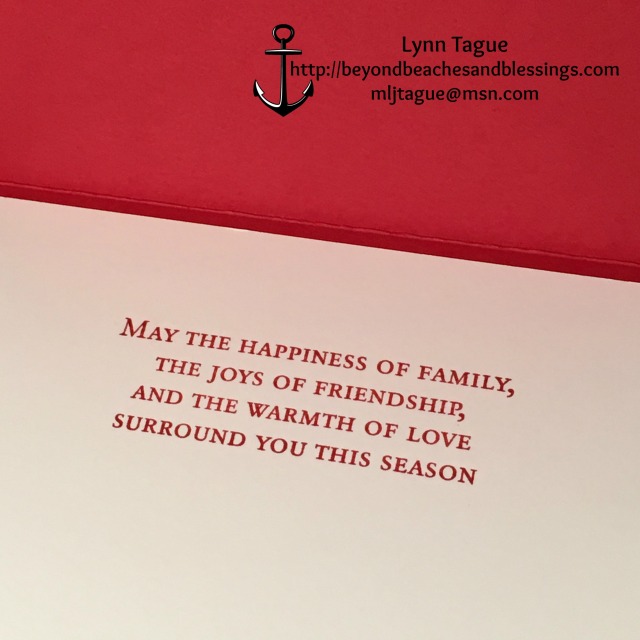
If you pull up on the bow made with baker’s twine, you’ll reveal the gift card.  You can also write a personal message on the back of the insert.  I chose to stamp a sentiment from the Candy Cane Christmas stamp set on the back in Whisper White ink.  You can also see the stitched border on the top edge of the gift card insert.  I adhered the gift card to the Real Red cardstock insert with a small glue dot at the top and bottom. Take a look.

StampinUp Christmas 3D Snack and Gift Card Holder made with Candy Cane Lane DSP, Candy Cane Christmas stamp set, Stitched Shape Framelits, designed by demo Lynn Tague. See more cards and gift ideas at BeyondBeachesandBlessings.com #BeyondBeachesandBlessings

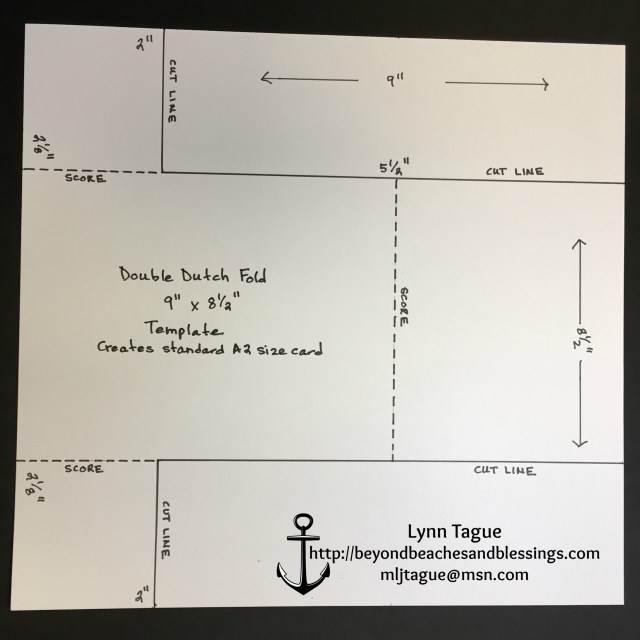
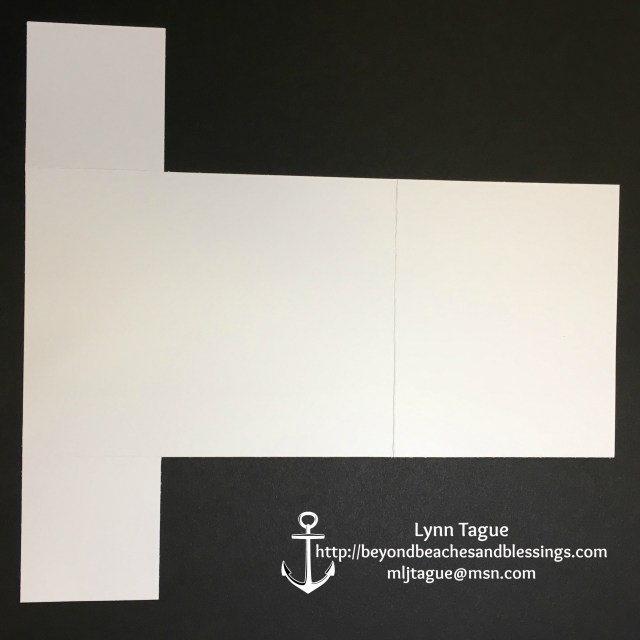
You can use any Designer Series Paper pack with coordinating stamp set and embellishments to create this gift box combo for any occasion. Stay tuned to my blog this week for another version of this gift box along with the template and instructions for assembling. I’ll also be sharing the recipe for the Smores Christmas Snack Mix.

Don’t want to miss my future posts? Provide your email address in the space to the left and press the Follow Me Now button. You’ll receive a notification each time I publish a new blog post. I also LOVE reading your feedback so please leave your comments on my project below. What type of special gifts do you have to give this holiday season? Do you plan to use this special snack/gift box combo in your gift giving?

Thank you for visiting today. To continue with the hop, please refer to the Blog Hop Line-up below. We hope you will join us on next month’s Pals Blog Hop!

Blessings,

Lynn

Blog Hop Line-up:  

    1. Mary Fish at Stampin’ Pretty
    2. Pamela Sadler at Stampin Pink Rose
    3. Debbie Mageed at Secret Stamper
    4. Susan Itell at Simple Stampin
    5. Maggie Mata at Maggie Made Cards
    6. Jeanie Stark at Just Stampin’
    7. Katy McGloin at Just Fun Stamping
    8. Jackie Diediker at Stampin’ Jackie
    9. Becky Volpp at InkblossomwithBecky
    10. Lynn Tague at BeyondBeachesandBlessings.com
    11. Beth McCullough at Stamping Mom
    12. Wendy Klein at Doggone Delightful Stampin’
    13. Jennifer Michalski at Stamping Serenity
    14. Karen Zaring Browning at Stamp With Me KZB
    15. Sue Becker at RnR Stamping
    16. Amy Hoptay at Craft Carnivore
    17. Lisa Ann Bernard at Queen B Creations
    18. Rae Harper Burnet at Wild West Paper Arts

Supplies used in my “Anything But a Card” project:

Posted in Christmas, Designer Series Paper, Favors, Gifts and 3D Projects, Stampin' Up! | Tagged , , , , , , , | 6 Comments

Swirly Bird Meets Holly Berry Happiness

Where did October go? Did you celebrate Halloween in some fashion? We do not get a large number of Trick or Treaters in our neighborhood, so we joined them on the sidewalks around our neighborhood. We dressed up our K9 family member, Panda, in a Panda costume – adorable! Then we grabbed a bowl full of sweet treats and took to the neighborhood to greet children (and parents) and provide them with a treat from Panda. We had a great time and Panda enjoyed herself, too.  She was quite popular.

Now, about today’s card, the first card I created using our ever popular Swirly Bird stamp set and Swirly Scribbles Thinlits was a Halloween card. If you haven’t seen this card, click here to read my post. I mentioned in my post this card layout is versatile and can be used for many different occasions. Another of which is Christmas. Take a look.

StampinUp Christmas Card made with Swirly Bird and Holly Berry Happiness stamp sets, Swirly Scribbles Thinlits, designed by demo Lynn Tague. See more cards and gift ideas at BeyondBeachesandBlessings.com #BeyondBeachesandBlessings

To create this card, I used the Swirly Bird stamp set and Swirly Scribbles Thinlits from the SU! Annual Catalog (available as a bundle saving you 10%) along with the Holly Berry Happiness stamp set and Holly Berry Builder Punch from the SU! Holiday Catalog (also available as a bundle). Cardstock and ink colors include Whisper White, Real Red, and 2016-2018 InColor Emerald Envy. You’ll notice I used the Red Glimmer Paper for the berries. The inside and outside sentiments come from the Holly Berry Happiness stamp set.

This card really does go together quickly and easily – I created 32 of these cards earlier this week to use for an upcoming card swap. Below is a peek of the inside of the card. I just love the sentiments from the Holly Berry Happiness stamp set.

StampinUp Christmas Card made with Swirly Bird and Holly Berry Happiness stamp sets, Swirly Scribbles Thinlits, designed by demo Lynn Tague. See more cards and gift ideas at BeyondBeachesandBlessings.com #BeyondBeachesandBlessings

I can’t believe November is here and we are turning our thoughts toward Thanksgiving and preparations for the Christmas and New Years holiday season. Have you thought about your Christmas cards yet? Do you have an idea in mind? Or, are you the type who has all your Christmas cards completed and ready to drop in the mail following Thanksgiving? Leave me a comment below and let me know your answers to these questions. Also, let me know what you think about this card and what you might change. I love reading your comments.

SU! has a great November promotion offering the presale of a new die set, from the 2017-2018 Annual Catalog, Stitched Shapes Framelits.  These framelits are only available now through November 30, 2016.  After that, you’ll have to wait until the new 2017-2018 is released in June. There are also a number of stamp sets that work well with these framelits available for the same time period at 25% off. See all of the stamp sets available at this special limited-time discount, here.  Check out this video for more information on these beautiful framelits.

Thank you for stopping by by blog today. If you’ve not subscribed to my blog, I encourage you to enter your email address in the box to the right and then click on the Follow Me Now button.  You’ll receive an email each time I publish a new blog post.  And, since we can begin sharing sneak peeks of the new 2017 Occasions catalog and Sale-A-Bration beginning at 2 PM Central on Monday, November 7, I encourage you to subscribe so you won’t see out on all the fun new sneak peeks I am preparing to share with you. I am so excited to begin sharing sneak peeks with you in just a few days.  Stay tuned.

Blessings,

Lynn

Supplies used in today’s card:

Posted in Cards, Christmas, Halloween, Panda, Personal, Stampin' Up! | Tagged , , , , | 6 Comments

Wicked Folds Revisited

You may recall I participated in the October 2016 Pals Blog Hop “Wicked Folds” with my Halloween themed Double Dutch fold card. If you missed this post, you can check it out by clicking, here. The Pals Blog Hop offers great card-making inspiration each month.

Today, I want share the Christmas version I created using the Double Dutch fold.  And, I also want to share the template I created for this card. The Christmas season is my favorite time of year and I love this time for year for so many different reasons. I’ll touch on this more as we get closer to the holiday. The point is, now is a great time to be thinking about making your homemade Christmas cards for family and friends.

For today’s card, I used the Cookie Cutter Christmas stamp set and coordinating Cookie Cutter Builder Punch from the 2016 Holiday Catalog.  These products are also sold together as a bundle which saves you 10% off the cost of buying them separately.

StampinUp Double Dutch Fold Christmas Card made with Cookie Cutter Christmas stamp set, Layering Circles Framelits, Candy Cane Lane DSP, Delicate White Doilies designed by demo Lynn Tague. See more cards and gift ideas at BeyondBeachesandBlessings.com #BeyondBeachesandBlessings

I used Real Red, Crumb Cake, and Whisper White cardstock along with the Candy Cane Lane Designer Series Paper.  I embellished the card using a Delicate White Doily, and the Candy Cane Lane Baker’s Twine in the Real Red.  I stamped the Gingerbread Man in Soft Suede, as it is not quite as dark as Early Expresso. This supplies created a fun and whimsical looking card.  Makes me hungry for a gingerbread cookie.

Curious how I finished off the inside of the card?  Have a look!

StampinUp Double Dutch Fold Christmas Card made with Cookie Cutter Christmas stamp set, Layering Circles Framelits, Candy Cane Lane DSP, Delicate White Doilies designed by demo Lynn Tague. See more cards and gift ideas at BeyondBeachesandBlessings.com #BeyondBeachesandBlessings

You’ll notice I like to finish off the insides of my cards and I also like to leave some “white space” on the inside so I can write a personal note to the recipient.  I also used the Candy Cane Lane DSP on the back flap of the envelope and stamped a couple of candies in the front lower left corner.

The Double Dutch fold card is often made using two pieces of cardstock.  However, I wanted to make this style of card using a single piece of cardstock.  I also wanted the finished size of the card to be a standard A2 size (5.5″ x 4.25″).  Below is the template.

StampinUp Double Dutch Fold Card Template, designed by demo Lynn Tague. See more cards and gift ideas at BeyondBeachesandBlessings.com #BeyondBeachesandBlessings

Here are the steps to create my Double Dutch fold card:

  1. Start with a piece of cardstock measuring 8.5″ x 9″
  2. Along the 9″ side cut 2-1/8″ down from the top and up from the bottom at the 2″ mark
  3. Slide to the 5.5″ mark and score from top to bottom (or just score the 4.25″ between the two 2-1/8″ lines like I did on the template; either way works)
  4. Turn to the 8.5″ side, at 2-1/8″ mark cut from top down to meet the 2″ line; score from the 2″ line to the bottom
  5. Flip cardstock over and repeat step 4 for the other end/side

Your piece of cardstock should now look like the example below.  Then, fold card on the score lines using a bone folder to step a strong crease.  It seems difficult at first, but once you get a couple of them done, they are pretty quick to cut and score.

StampinUp Double Dutch Fold Card, Cardstock Sample, designed by demo Lynn Tague. See more cards and gift ideas at BeyondBeachesandBlessings.com #BeyondBeachesandBlessings

To decorate the front and insides you need to cut the following pieces:

  • 2 pieces measuring 4″ x 3-1/4″ (Real Red in my sample)
  • 2 pieces measuring 3-3/4″ x 3″ (Candy Cane Lane DSP in my sample)
  • 4 pieces measuring 1-3/4″ x  1-7/8″ (Real Read in my sample)
  • 4 pieces measuring 1-1/2″ x 1-5/8″ (Candy Cane Lane DSP in my sample)
  • 1 piece measuring 5-1/4″ x 4″ (Whisper White in my sample; inside)
  • 1 piece measuring 1-1/2″ x 3-3/4″ (Candy Cane Lane DSP in my sample; inside)

Here are the Halloween and Christmas cards side-by-side. Which is your favorite? Leave me a comment. I would LOVE to hear which one is your favorite.

Hope you enjoyed this fun Double Dutch fold card technique and the two samples I created for you.  If you have any questions, don’t hesitate to ask me.  I am here to help you.

I would also love to be your personal Stampin’ Up! Demonstrator!  If you’re interested in making either of these cards, the supplies are listed below for easy ordering.  Just click on a product below or click here to start shopping with me.

Enter the October Host Code QSHQPW2Q if placing an order below $150.  If your order is above $150, do not enter the Host Code; this will allow you to receive all of your Host Reward benefits.

Thank you for visiting my blog today.

Blessings,

Lynn

Supplies used to create this card:

Posted in Cards, Christmas, Designer Series Paper, Fun Fold, Stampin' Up! | Tagged , , , , , | 7 Comments

Wicked Folds

PalsBlogHop_2016

Welcome to the Pals Blog Hop for October 2016. We are thankful you stopped by to take a look at our new 2016 Blog Hop monthly themes.  This month our projects feature cards made using “wicked” folds. What is a “wicked” fold? It is anything other than the standard A2 card fold. We hope to provide you with lots of ideas and that you enjoy our creations.

You may just be starting the Blog Hop or may have come from the previous link from the Line-up on the Pals Blog Hop listing shown below.  The full lineup will help you move along from blog to blog so you may see all the projects.

For this month’s Blog Hop, I chose to use a Double Dutch Fold Card.  I’m not fond of the card being made from two pieces of cardstock, so I created my own template using just one sheet of cardstock that is 8.5″ x 9″ which produces a standard A2 size card when finished.  I also chose to make a Halloween themed card as well as a Christmas themed card using products from the 2016 Holiday Catalog.

StampinUp Double Dutch Fold Halloween Card made with Halloween Scares and Spooky Fun stamp sets, Layering Squares Framelits, Halloween Night Specialty DSP, designed by demo Lynn Tague. See more cards and gift ideas at BeyondBeachesandBlessings.com #BeyondBeachesandBlessings

This Halloween card was made using the Pumpkin Pie, Basic Black, and Whisper White cardstock; Halloween Night Specialty Designer Series Paper, and the Halloween Scares and Spooky Fun stamp sets.  I embellished the card using the Halloween Night Baker’s Twine in the Pumpkin Pie and Basic Black stripe for the double bow and added three Pumpkin Pie large enamel dots from Halloween Nights Enamel Dots.

Curious how I finished off the inside of the card?  Take a look!

StampinUp Double Dutch Fold Halloween Card made with Halloween Scares and Spooky Fun stamp sets, Layering Squares Framelits, Halloween Night Specialty DSP, designed by demo Lynn Tague. See more cards and gift ideas at BeyondBeachesandBlessings.com #BeyondBeachesandBlessings

If you’d like to see the Christmas version of this card and see the cutting/scoring template to make a Double Dutch Fold Card, subscribe to my blog by clicking on the Follow Me Now button to the left.  You’ll receive an email notification each time I update my blog.  I can’t wait to show you the Christmas version of this card, so don’t forget to stop back later this week.

Thanks for visiting. To continue with the hop, please refer to the Blog Hop Line-up below. We hope to see you on next month’s Pals Blog Hop! 

Blessings,

Lynn

Blog Hop Line-up:  

  1. Mary Fish at Stampin’ Pretty
  2. Patti MacLeith at Papercrafts by Patti
  3. Sherrie Gross at Stampin’ Sunshine
  4. Wendy Klein at Doggone Delightful Stampin’
  5. Beth Fairweather at Beth Fairweather Designs
  6. Amy Hoptay at Craft Carnivore
  7. Jennifer Spiller at Westside Paper Creations
  8. Lisa Ann Bernard at Queen B Creations
  9. Pamela Sadler at Stampin Pink Rose
  10. Lynn Tague at Beyond Beaches & Blessings
  11. Tricia Chuba at ButterDish Designs
  12. Jackie Diediker at Stampin’ Jackie
  13. Jeanie Stark at Just Stampin’
  14. Karen Hallam at Karen’s Stampin’ Habit!
  15. Katy McGloin at Just Fun Stamping
  16. Peggy Noe at Pretty Paper Cards
  17. Beth McCullough at Stamping Mom
  18. Debbie Mageed at Secret Stamper
  19. Staci Rivera at Clever Bow Tie Designs
  20. Sue Becker at RnR Stamping
  21. Rae Harper Burnet at Wild West Paper Arts

Supplies used to create this cards include:

Posted in Cards, Designer Series Paper, Fun Fold, Halloween, Stampin' Up! | Tagged , , , , | 10 Comments

My Favorite Season

PalsBlogHop_2016

Welcome to the Pals Blog Hop for September 2016. We are thankful you stopped by to take a look at our new 2016 Blog Hop monthly themes.  This month our projects represent our favorite year end Season. It may be Autumn, Winter, Halloween, Thanksgiving or Christmas (and maybe even a combination!) We hope to provide you with lots of ideas and that you enjoy our creations.

You may just be starting the Blog Hop or may have come from the previous link from the Line-up on the Pals Blog Hop listing shown below.  The full lineup will help you move along from blog to blog so you may see all the projects.

My favorite season is the Christmas and I enjoy spreading the spirit of Christmas. I especially love sending Christmas cards to family and friends. My Pals Blog Hop card for September features the new Star of Light photopolymer stamp set and the coordinating Starlight Thinlit Dies from page 9 of Stampin’ Up!’s new Holiday Catalog.  I just LOVE these two new products; sold separately or as a discounted bundle!

I chose Shimmery White and Night of Navy cardstock combined with Silver Foil Sheets and Dazzling Diamonds Glimmer Paper. After stamping the images and sentiment “Merry Christmas” on the Shimmery White cardstock, I ran it through my Big Shot using the Softly Falling Textured Impressions Embossing Folder before adhering the assembled Star and Silver Metallic Thread.  I used Stamping Dimensionals to adhere the Star to the Whisper White cardstock.

To finish off the front, I embellished with a few Rhinestone Basic Jewels. I also decorated the back flap of the envelope and included the message “A little Christmas Spirit brightens all the world” and lined the inside of the envelope with Silver Foil.

StampinUp CAS Christmas Card made with Star of Light stamp set, Starlight Thinlit Dies, Softly Falling TIEF and Silver Foil Sheets, designed by demo Lynn Tague. See more cards and gift ideas at BeyondBeachesandBlessings.com #BeyondBeachesandBlessings

When assembling the card front, I adhered the Shimmery White to the Silver Foil. Then, I used Stamping Dimensionals on the back of the Silver Foil and adhered to the Night of Navy card base.

Below is a picture of the inside of the card. I stamped the sentiment and embellishment in Night of Navy ink on Shimmery White cardstock.

StampinUp CAS Christmas Card made with Star of Light stamp set, Starlight Thinlit Dies, Softly Falling TIEF and Silver Foil Sheets, designed by demo Lynn Tague. See more cards and gift ideas at BeyondBeachesandBlessings.com #BeyondBeachesandBlessings

Finally, since it was difficult to get my lighting just right, avoiding glare with the metallic silver paper, I took another picture of the front of this card. Here, I placed the card and envelope inside of a clear envelope and laid on the keyboard of my laptop. I think the silver shows up better in this picture. And you can also see the Dazzling Diamonds Glimmer Paper which I used for the top layer of the Star.

StampinUp CAS Christmas Card made with Star of Light stamp set, Starlight Thinlit Dies, Softly Falling TIEF and Silver Foil Sheets, designed by demo Lynn Tague. See more cards and gift ideas at BeyondBeachesandBlessings.com #BeyondBeachesandBlessings

Do you have a favorite season? Leave me a comment below and let me know what your favorite season is and what you think of the card I prepared for you today. I love to read your posts. It helps me learn more about you.

I encourage you to follow my blog by clicking on the Follow Me Now button to the right. Each time I publish a new post you’ll will receive an email notification.

Thank you for visiting. To continue with the hop, please refer to the Blog Hop Line-up below. We hope to see you on next month’s Pals Blog Hop! 

Blessings,

Lynn

Blog Hop Line-up:  

  1. Mary Fish at Stampin’ Pretty
  2. Kim Jolley at Stampin’ Artfully
  3. Tricia Chuba at ButterDish Designs
  4. Susan Itell at Simple Stampin
  5. Becky Volpp at Inkblossomwithbecky
  6. Lisa Ann Bernard at Queen B Creations
  7. Sherrie Gross at Stampin’ Sunshine
  8. Wendy Klein at Doggone Delightful Stampin’
  9. Jennifer Michalski at Stamping Serenity
  10. Karen Zaring Browning at Stamp With Me KZB
  11. Pamela Sadler at Stampin Pink Rose
  12. Staci Rivera at Clever Bow Tie Designs
  13. Jackie Diediker at Stampin’ Jackie
  14. Lynn Tague at Beyond Beaches & Blessings
  15. Beth McCullough at Stamping Mom
  16. Katy McGloin at Just Fun Stamping
  17. Amy Hoptay at Craft Carnivore
  18. Karen Hallam at Karen’s Stampin’ Habit!
  19. Peggy Noe at Pretty Paper Cards
  20. Debbie Mageed at Secret Stamper
  21. Mary Hanson at Up North Stampin’
  22. Jane Knudsen at see jane stamp
  23. Patti MacLeith at Papercrafts by Patti
  24. Jeanie Stark at www.juststampin.com
  25. Sue Becker at www.RnRStamping.com
  26. Pam Dotts at Clearly Southern Stampin’
  27. Rae Harper-Burnet at Wild West Paper Arts

Supplies used to create my card include:

Posted in Cards, Christmas, Stampin' Up! | Tagged , , , , | 11 Comments

Are you ready for some football?

It’s football season, and I could not be more excited. I LOVE football! The college season kicked off last weekend. This weekend, tonight in fact, is the kick off to the NFL season. No pun intended.

Having been born and raised here in Iowa, my favorite Iowa college football team is the Iowa State Cyclones.  I remember as a child growing up, my parents leaving early on Saturday mornings during football season and returning after dark.  Sometimes, after we were already tucked into bed.  They had season tickets to the Cyclone Football games.  Little did I know at the time, I would one day follow in their footsteps.

In 2008, our daughter headed off to college attending Iowa State University, and thus began our new family tradition of getting season tickets to the football games each year. This tradition continues today.

Each year, the second game of the season is the CyHawk football game, a match up between the Iowa State Cyclones and the University of Iowa Hawkeyes.  This is always an exciting time and, shall I say, a very friendly rivalry.  This year’s game kicks off at 6:30 PM (Central time) this Saturday, September 10.  Go Cyclones!

We usually celebrate this special game at work with a special tailgate-themed treat day and by wearing our team colors.  This year we’ve serving up walking tacos, a few side dishes, and desserts.  I decided to put together little team inspired treats for each member of our team at work.  The Cyclone and Hawkeye S’More Snack Mix was inspired by a Christmas-themed snack mix I ran across while on Pinterest one evening and consists of Golden Grahams, miniature marshmallows, and M&Ms.

For these types of individually packaged treats, there are just times when you have to reach to your laptop, computer or iPad and your personal printer to act as your rubber stamps. For the rest of the project you can use your Stampin’ Up! cutting tools and dies. Take a look at the Cyclone version.

StampinUp 3D Favor made with 2" Punch, Layering Circles Die, and Dimensionals, designed by demo Lynn Tague. See more cards and gifts ideas at BeyondBeachesandBlessings.com #BeyondBeachesandBlessings #IowaState #Cyclones #Football

For the tag, I used the 2″ circle punch to punch out the artwork I created on my laptop; the scallop circle from the Layering Circles Framelits; and the stitched tag is from Taylored Expressions Stitched Tag Stacklets.  For the Cyclone version of the S’More Mix, I used Stampin’ Dimensionals to pop up the yellow scallop circle from the red tag.  I tied the tags onto the clear cellophane bags using Real Red or Basic Black Baker’s Twine.  I did not use the Stampin’ Dimensionals on the Hawkeye S’More Mix tag.  Why?  I wanted the tag for the team I cheer for to be just slightly different.  Well, more special.  You have to look closely to really notice the difference.

Here is the Hawkeye S’More Mix version.

StampinUp 3D Favor made with 2" Punch, Layering Circles Die, and Dimensionals, designed by demo Lynn Tague. See more cards and gifts ideas at BeyondBeachesandBlessings.com #BeyondBeachesandBlessings #UniversityofIowa #Hawkeyes #Football

If you’re from Iowa, which team will you be cheering for on Saturday?  Regardless of where you live, do you have a favorite college or NFL football team?  Leave me a comment below letting me know if you’re a football fan and who your favorite college or NFL team is.  I love reading your comments and learning more about you.

Interested in the recipe for the S’More Mix?  I used 3/4 cup of Golden Grahams cereal, 1/2 cup of miniature marshmallows, and 1 generous tablespoon of M&Ms in each bag.  I measured out each package separately so the snack mix was consistent in the amount of each ingredient.  I picked up the M&Ms at a local candy shop where you can select your M&Ms by color.  I used red and gold M&Ms in the Cyclone mix and Black and Gold M&Ms in the Hawkeye mix.

If you’d like to follow my blog, click on the Follow Me Now button to the left.  You’ll receive a personal email each time I publish a new blog post.

I’d also love to be your personal Stampin’ Up! Demonstrator.  So, if there is anything I can assist you with or you have any questions, please don’t hesitate to contact me via email using the Contact Me link above.  I am more than happy to assist you.

Thank you for stopping by today.

Blessings,

Lynn


Supplies used for this project includes:

Posted in Favors, Gifts and 3D Projects, Personal, Recipe, Stampin' Up! | Tagged , , , , , , , | Leave a comment

Blog Candy Winners & Instructions

What a delight it has been for me to read your Halloween costume stories and learn about your favorite Halloween treats from the comments you’ve posted to my last two blog posts, Halloween Sneak Peek (PPA314) and Halloween Surprise!  I enjoy reading your stories and learning more about you through your posts.

What you’ve been waiting for – my first two Blog Candy Winners are:

I ask each winner to email me their mailing address at mljtague@gmail.com along with stating the version of the card you would like to receive.  I will then get the cards mailed to you.  Enjoy and congratulations to our lucky winners!  I want to thank everyone who participated by answering my Blog Candy questions.

I have received numerous requests for the instructions for making the diagonal easel cards that I have been posting.  Trust me, they really are easy to make.  Here is the picture of the most recent card I made from my Halloween Surprise! post:

Here are the instructions for making a diagonal easel fun-fold card:

  1. Cut one 11″ x 4.25″piece of cardstock for card base.  I used Pumpkin Pie for this card.  Score along 11′ side at 5.5″ and fold using bone folder.  This creates a 5.5″ wide x 4.25″ tall card base.  Open card base up and score the front of the card base from the upper right-hand corner to the lower left-hand corner.
  2. Cut two 5.25″ x 4″ pieces of Basic Black cardstock.  Cut one piece on a diagonal from the upper right corner to the lower left corner, creating two Basic Black triangles.  Leave the other piece whole for the inside of the card.
  3. Cut two 5″ x 3.75″ pieces of coordinating DSP patterned paper.  I used paper from the Halloween Night Specialty Designer Series Paper pack.  Cut one piece on a diagonal from the upper right corner to the lower left corner.  Leave the other piece whole for the inside of the card.  Note, I used a white background with dots for front of card and a black background with dots for the inside of the card.
  4. Using tape runner, adhere each patterned triangle to the corresponding Basic Black triangle.  Adhere the finished triangles to the corresponding half of the front of the Pumpkin Pie card base.  Gently fold front of the card base on the diagonal score line.
  5. Decorate the front of the card using special dies, punches, stamps and/or fussy-cut figures.  I used stamps and dies from Halloween Scares, Spooky Fun, and the Halloween Scene Edgelits Dies all from the new 2016 Holiday Catalog which will be available for purchase beginning September 1.  Be careful not to apply adhesive above the diagonal score line.  Just adhere the portion of your cut-outs that are below the score line.
  6. Using tape runner, adhere the patterned paper for the inside to the Basic Black rectangle piece.  Then, adhere to the inside of the card.
  7. Stamp a sentiment for the inside of the card.  Punch or die-cut the sentiment and adhere using Dimensionals.  Hold open the front of the card so the bottom rests on the inside of the card, adhere the sentiment so that it holds the front of card open like an easel.  Secure sentiment in place.  I like using the frame die in the Rose Garden Thinlits set and is the frame I used in this card.  I also stamped a Bat along with the sentiment.  Be creative, you can use any shape you like or any shape that ties in with the theme on the front of the card.
  8. Finally, I always like to use some of the patterned paper I used to make the card, on the back flap of the envelope to coordinate the envelope with the card.  Just be sure to use a strong adhesive to adhere the paper to the envelope flap.  You could even stamp a Bat on the front of the envelope, too.

Hope these instructions help you create some fun and unique cards.  If you have any additional questions, please don’t hesitate to email me.  I am here to assist you.

Thanks for stopping by today.

Blessings,

Lynn

Posted in Uncategorized | 2 Comments

Halloween Surprise!

I was THRILLED when my box of new products from Stampin’ Up!’s 2016 Holiday Catalog arrived, as I had this card idea in my mind and couldn’t wait to get it created.  I have really enjoyed using this easel style card layout.  Here is, yet, another take on my original “Cut It Up” card from the August 2016 Pals Blog Hop.  Click here to view this card and post.

BLOG CANDY:  For a chance to receive one of these three cards, answer the question, “What is your favorite Halloween treat?” by leaving a comment below.  Your response must be posted by 11:59 PM (CDT) on Sunday, August 28.  One winner will be randomly drawn from those that answer the Blog Candy question in their comment.  The lucky winner will be posted on my blog next week and will get to pick which card they receive.

As I usually do, I created a couple versions with slight changes.  Just imagine receiving this card and the wonderful surprise when you open it up.

StampinUp Fun Fold Easel Halloween Card made with Halloween Nights Designer Series Paper (DSP), Halloween Scares Stamp Set, Spooky Fun Stamp Set, and Halloween Scares Edgelits Dies, designed by demo Lynn Tague. See more cards and gifts ideas at BeyondBeachesandBlessings.com #BeyondBeachesandBlessings

Here is the card when it is opened:

StampinUp Fun Fold Easel Halloween Card made with Halloween Nights Designer Series Paper (DSP), Halloween Scares Stamp Set, Spooky Fun Stamp Set, and Halloween Scares Edgelits Dies, designed by demo Lynn Tague. See more cards and gifts ideas at BeyondBeachesandBlessings.com #BeyondBeachesandBlessings

Supplies used to create this card include:

  • Patterned paper from the Halloween Night Specialty Designer Series Paper pack
  • Halloween Scares stamp set and coordinating Halloween Scares Edgelits Dies which can be purchased as a bundle which means greater savings for you
  • Spooky Fun stamp set
  • Basic Black, Whisper White, Pumpkin Pie, and Daffodil Delight cardstock
  • Basic Black and Pumpkin Pie ink (Pumpkin Pie is lightly sponged onto the moon)
  • Rose Garden Thinlits (from the 2016-2017 Annual Catalog) orange frame with Halloween sentiment on inside of card

Here are the two other versions I created.  Notice one version does not contain the spooky tree.  Which version do you like best, with or without the tree?  Leave a comment below and let me know.  I love reading your stories and feedback.

StampinUp Fun Fold Easel Halloween Card made with Halloween Nights Designer Series Paper (DSP), Halloween Scares Stamp Set, Spooky Fun Stamp Set, and Halloween Scares Edgelits Dies, designed by demo Lynn Tague. See more cards and gifts ideas at BeyondBeachesandBlessings.com #BeyondBeachesandBlessings

Hope you enjoyed today’s card inspiration.  Can you think of a few really cool possibilities for holiday scenes.  You’ll come up with all sorts of creative ideas once you see the new 2016 Holiday Catalog, there are soooooooooo many possibilities!!  There are also many other great possibilities using products in the Annual Catalog.  Who knows, maybe I’ll have another one to share down the road.  These cards are just plain fun to make and easier to put together than you might think.  Give one a try!

If you’ve enjoyed my blog post, please consider following my blog by clicking on the Follow Me Now button to the right and providing your email address.  You’ll receive an email each time I publish a new blog post.

Blessings,

Lynn

Posted in Blog Candy, Cards, Designer Series Paper, Fun Fold, Halloween, Stampin' Up! | Tagged , , , , , | 21 Comments

Halloween Sneak Peek (PPA314)

Oh, the fun memories I have of dressing up for Halloween and then going out Trick or Treating with my friends.  In our community, we’d have to do a trick or tell a joke or riddle in order to receive a treat.  In the community where my husband grew up, they’d just knock on the door, greet the person who answered and get a treat.  Really?  No joke, riddle or trick – what fun is that?

I also mentioned in an earlier post about spending time with my great grandmother on weekends growing up.  The weekend before Beggar’s Night, we’d sit at her small kitchen table in her very tiny house and fill sandwich size baggies with fun size candy bars.  I remember there being anywhere from six to ten treats in each bag.

The first year we filled about 50 treat bags because Grandma didn’t get many Trick or Treaters.  When Beggar’s Night arrived that first year, to her surprise she had more children stop by her home than she had anticipated (I think word got out quickly that evening about the “old lady in the little house” giving out great treats.  The next year, we filled 100 bags.  The year after that even more.

Each year, stopping by her tiny little house for her wonderful Halloween treat bags became more and more popular among the Trick or Treaters.  Our parents would always drive us over to her house to make our visit, but we’d usually go early or wait until Beggar’s Night ended.  The last time I remember filling treat bags, we filled over 300 of them!  It brought such delight to my Grandmother to have so many children come by her house.

My card today follows the format of the Pals Paper Arts Challenge #314 and features products from our new 2016 Holiday Catalog.  Here is the challenge format for this card.  You can visit PalsPaperArts.com each week and check out the card inspiration.  You can even participate and share your cards with others.

ppa314

Beginning September 1, you can begin ordering and enjoying the many wonderful products from our 2016 Holiday Catalog.  There are so many awesome new products in this seasonal catalog, you will love it!  I used the following supplies to create today’s Halloween-inspired card:

  • Patterned paper from the new Halloween Nights Designer Series Paper pack
  • Scarecrow is from the Cookie Cutters Halloween stamp set which coordinates with the new Cookie Cutter Builder Punch
  • Orange dots are from the Halloween Night Enamel Dots pack
  • Orange and black twine bow from the Halloween Night Baker’s Twine pack
  • 5/8″ Burlap Ribbon from the 2016-2017 Annual Catalog

StampinUp CAS Halloween Card made with Halloween Nights Designer Series Paper (DSP), Cookie Cutter Halloween Stamp Set and Cookie Cutter Builder Punch, designed by demo Lynn Tague. See more cards and gifts ideas at BeyondBeachesandBlessings.com #BeyondBeachesandBlessings #PPA314

This next card I just switched up the patterned paper used to trim the sides of the patterned pumpkin paper.  The Burlap ribbon reminded me of the straw used to stuff scarecrows, so thought it would tie in nicely with the Scarecrow from the Cookie Cutter-Halloween stamp.

StampinUp CAS Halloween Card made with Halloween Nights Designer Series Paper (DSP), Cookie Cutter Halloween Stamp Set and Cookie Cutter Builder Punch, designed by demo Lynn Tague. See more cards and gifts ideas at BeyondBeachesandBlessings.com #BeyondBeachesandBlessings #PPA314

So, which card is your favorite?  They are very similar.  Do you like the black patterned paper or the orange patterned paper as the trim?  Which do you think makes the scarecrow pop?

BLOG CANDY:  Want a chance to receive one of these Halloween cards?  Leave a comment below telling us about a Halloween tradition or share something about a favorite costume you’ve worn.  I look forward to reading your comments and learning more about you.  Leave your feedback by 11:59 CDT on Sunday, August 28.  One lucky winner will be randomly drawn from those who leave a comment answering the Blog Candy question.

I’ll have another fun Halloween-inspired card to share with you tomorrow featuring other great products from our new 2016 Holiday Catalog.  Click on the Follow Me Now button to the right to make sure you don’t miss any of my blog posts.  Thanks for stopping by!

Blessings,

Lynn


Posted in Blog Candy, Cards, Designer Series Paper, Halloween, Personal, Stampin' Up! | Tagged , , , , | 9 Comments

Let’s Cut It Up! One Last Time

Happy Saturday!  Today, I am posting my third and final “Cut It Up” easel card idea.  The original card was shared in my August 2016 Pals Blog Hop Post.  The second variation was shared yesterday.

This next card takes a more abstract or artsy approach and was created using paper from the Playful Palette Designer Series Paper Stack, in colors of Basic Black, Blushing Bride, Emerald Envy, Peekaboo Peach, Sweet Sugarplum, and Very Vanilla.  No shaker this time.  However, I did use the flowers from the Botanical Builders Framelits, and again finished them off with the Rhinestone Basic Jewels.

You’ll also notice I used the DSP to cut out the pieces for the flowers.  I used Dimensionals to pop-up the “Just For You” sentiment on the front of the card, for those who might find this simpler and quicker than the shaker.

StampinUp CAS Birthday Card made with Playful Palette Designer Series Paper (DSP), Botanical Builder Framelits, You're So Sweet stamp set, and Mini Treat Bag Thinlits, designed by demo Lynn Tague. See more cards and gifts ideas at BeyondBeachesandBlessings.com #BeyondBeachesandBlessings

There are so many colors to chose from within the Playful Palette patterned papers, I chose to go with the Sweet Sugarplum for the border and the stamping work.  The Peakaboo Peach cardstock would be a nice alternative to the speckled black DSP for the flowers, may have a greater contract based on the placement of the black patches within the pattern.

One the inside, I used the “Happy Birthday” sentiment from the Rose Wonder stamp set and cut the frame from the Rose Garden Thinlits.

StampinUp CAS Birthday Card made with Playful Palette Designer Series Paper (DSP), Botanical Builder Framelits, You're So Sweet stamp set, Mini Treat Bag Thinlits, Rose Wonder stamp set, and Rose Garden Thinlits, designed by demo Lynn Tague. See more cards and gifts ideas at BeyondBeachesandBlessings.com #BeyondBeachesandBlessings

Ok, you’ve now viewed all three variations of this card design.  What do you think of this Playful Palette version?  Which of the three versions is your favorite?  Leave me some feedback below and let me know your favorite.  I always appreciate your feedback and comments.

Before you leave, I encourage you to click on the Follow Me Now button to the right to subscribe to my blog, if you’ve not already done so.  I would love to assist you with any questions you may have or with purchasing Stampin’ Up! products.

Thanks for stopping by today.

Blessings,

Lynn

Supplies used in this card include:

Posted in All Occassion, Birthdays, Cards, Designer Series Paper, Stampin' Up! | Tagged , , , | 8 Comments